API Reference | Coffee Code Plugin – Getnet for WooCommerce (v1.5.8.1)

Welcome!
This is the manual for the Coffee Code Plugin – Getnet for WooCommerce so that you can integrate your company into Getnet’s Digital Platform and start enjoying the best solutions on the market. Plugin developed using the best development practices. Providing more agility, security and sales conversion.
SUMMARY
- What is the Getnet Digital Platform?
1.1. Don’t have a Getnet Digital Platform? - Requirements
- Payment Methods
- Environments
4.1. Homologation
4.2. Production - Plugin installation
- Configuring Credentials
- Configuring Payment Methods
7.1. Payment method management
7.1.1. How to contract and activate the Boleto and Pix features
7.2. Credit card
7.2.1. Cancellation/Refund
7.3. Billet
7.4. Pix - Tests
- Debug
9.1. Activating Debug Mode
9.2. Purchase Simulation
9.3. Viewing Logs - Configuring Callback URLs
- Updating the plugin
- Support
- Employees and Developers

1. What is the Getnet Digital Platform?
The Digital Platform is a complete ecosystem, created to provide the most diverse solutions for the payments market (eCommerce, mCommerce). These services allow accredited establishments to accept credit cards, bank slips and pix as payment methods in their online stores by implementing simple processes.
We suggest that you read this document and use it as a reference guide for any questions you may have when implementing the integration of your e-commerce platform with our Plugin.
1.1. Don’t have a Getnet Digital Platform?
If you haven’t registered with the e-commerce platform or only own the machine, hire it directly here.
You will be redirected to the Getnet page, where you will have to enter your CPF/CNPJ and proceed with contracting the Getpay Avançado e-commerce package directly from there.
2. Requirements
- PHP version 7.1 or higher.
- WooCommerce version 5.0.x or higher.
- Brazilian Market on WooCommerce.
3. Payment methods
- Credit cards
- Billet
- Pix
4. Environments
Before we start installing and configuring the plugin, let’s conceptualize and clarify the possible environments for working with the integration of this plugin with Getnet.
4.1. Homologation
Getnet’s Digital Platform homologation environment is a test environment that allows merchants to test their integration with the platform before putting it into production. This environment is an exact copy of the production environment, with all the features and functionalities available.
The approval environment is an important tool for ensuring that the merchant’s integration is working correctly before it is released to customers. It allows merchants to run load tests, check compliance with security standards and resolve any problems that may arise. To access the approval environment, merchants need to be accredited with Getnet.
To generate homologation credentials, contact Getnet support:
E-mail: [email protected]
Phone: 51 4020.4009
When you request approval credentials, you will need to specify which products you want to test.
Example: Billet, Credit Card and Pix.
4.2. Production
The production environment is the real environment where all transactions will be carried out and processed, so extreme care is recommended when using it.
5. Plugin installation
To install the plugin, follow these steps:
- Access the administrative panel of your WordPress site.
- Click on “Plugins” > “Add new“.
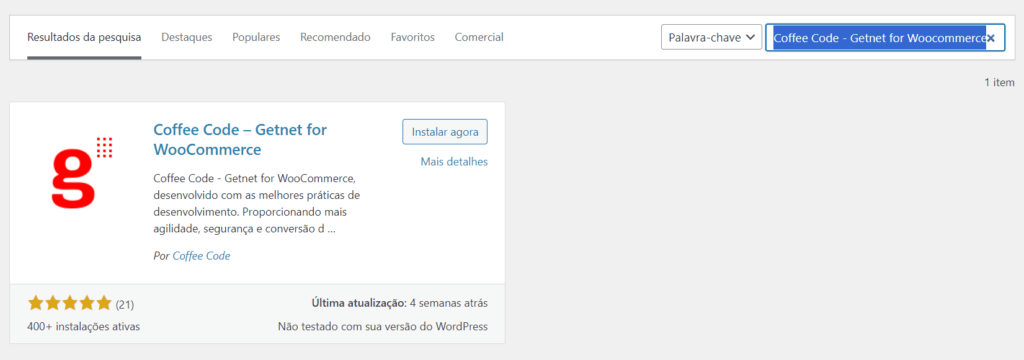
- In the search bar, type “Coffee Code – Getnet for WooCommerce“.
- Click on the “Install now” button to install the plugin.
- After installation, click on “Activate” to activate the plugin.
Check that the Coffee Code – Getnet for WooCommerce plugin is already installed and active, go to the “Plugins” menu. > “Installed plugins” and see if it displays in the list and if it’s already activated, if it doesn’t, check that you’ve done the previous steps correctly and if it does and it’s not active click on activate.
6. Configuring credentials
After receiving your credentials, it’s now time to configure the module. Go to the admin panel of your WordPress site: “WooCommerce“>”Settings” > “Getnet”.
Each credential only works in its own environment, i.e. homologation only in homologation and production only in production.

7. Configuring Payment Methods
Among the methods below, select the ones you want to use in your store.
- Go to the WooCommerce admin panel.
- Click on Settings >Payments.
- Select the payment method you wish to enable.

7.1. Payment method management
Configure the methods you want to use one by one. To open the settings, click on the Manage button.
Remember that to use the Boleto Bancário and Pix functionalities in the production environment, this option must be contracted and activated separately with Getnet.
7.1.1. How to contract and activate the Boleto and Pix features
Billet:
Note: Only Santander bank customers can issue boletos.
If you are already a Santander customer, please contact your Santander account manager:
- Set the digital certificate to Getnet;
- The agreement must be linked to the Getnet mailbox;
- And the CISA archive.
Once obtained, the information should be forwarded to Getnet support at the following e-mail address: [email protected]
PIX:
To use Pix, simply register a key with Santander and negotiate the rate directly with them.
7.2. Credit card
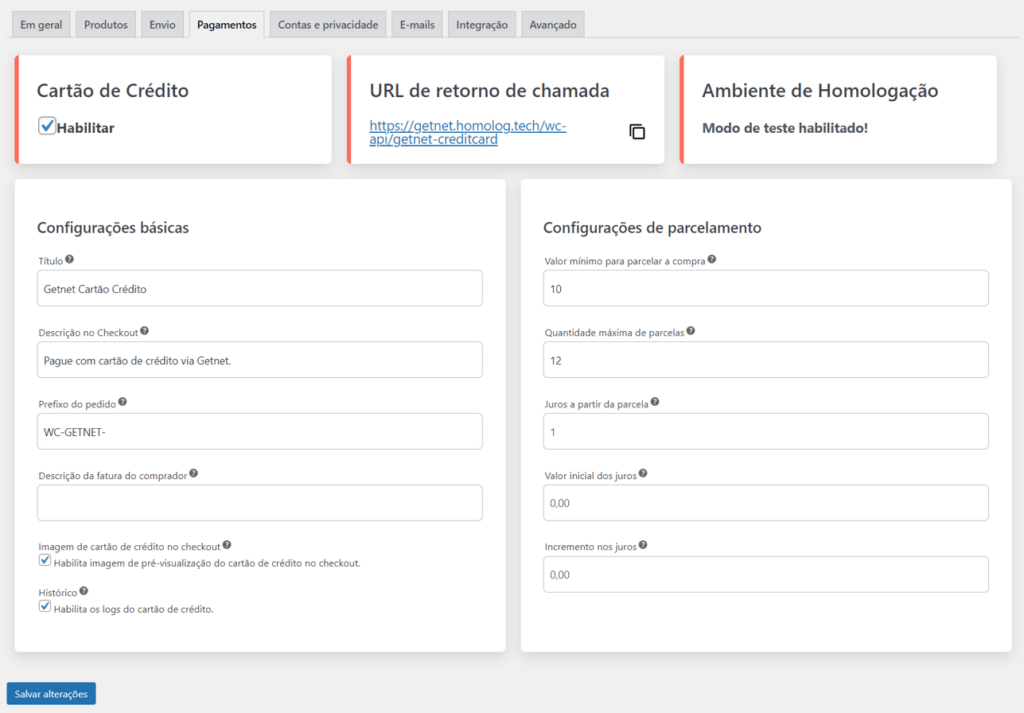
- Check option: Enable Credit Card;
- Insert title – Controls the title the user sees during checkout;
- Insert description at checkout – Controls the description the user sees during checkout;
- Enter order prefix – Enter a prefix for your order numbers. If you use your Getnet account for several stores, make sure that this prefix is unique;
- Insert description on buyer’s invoice – Text displayed on buyer’s card invoice;
- Check option: Credit card image at checkout – Enables credit card preview image at checkout;
- History– Check the option: Enable credit card logs (getnet-creditcard-order or getnet-creditcard-order-error. To view: “WooCommerce” > “Status” > “Logs”);
- Enter minimum amount to pay in installments – Minimum amount for installment purchases (this option enables installment payments when the purchase reaches this amount; if the total purchase is less than this amount, only cash credit will be allowed);
- Enter maximum number of installments – Selects the maximum number of installments for the payment;
- Interest from installment – Defines from which installment interest will be applied;
- Initial interest value – Percentage value of the interest to be applied to the installment;
- Interest increase – Percentage amount of interest increased on each installment;
- Save changes – Click on the Save changes button.
7.2.1. Cancellation/Refund
It is possible to request cancellation/refund of credit card payments.
Please note that this operation cannot be undone.
To cancel or refund a credit card purchase from a WooCommerce order, you’ll need to follow these steps:
- Go to the WooCommerce admin panel.
- Click on Orders.
- Locate the order you wish to cancel or reverse.
- Click on the Refund button.
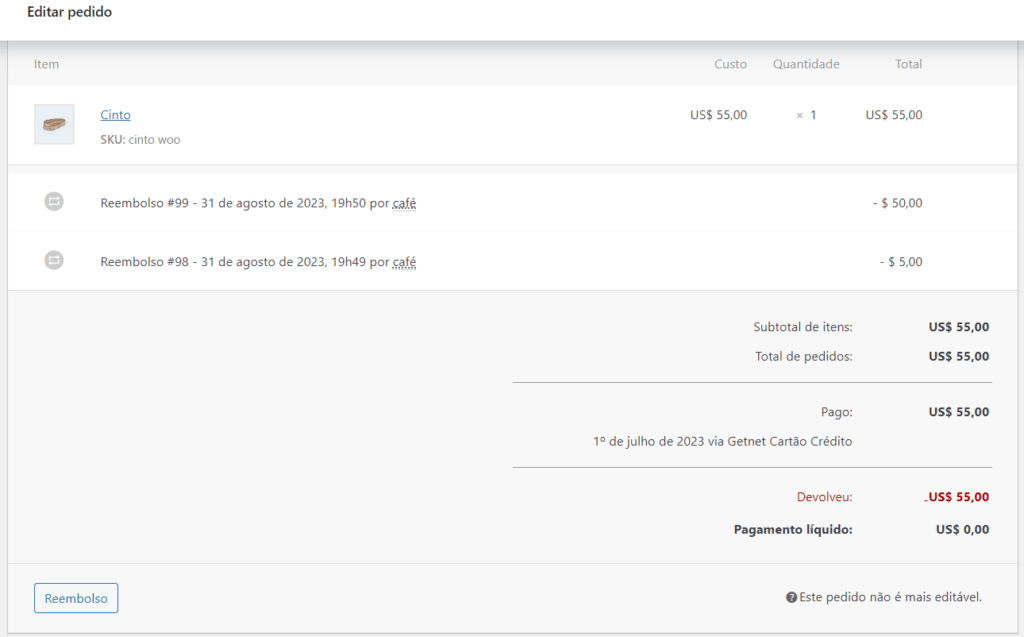
- Enter the amount to be refunded (which must be exactly the total amount of the order so that no error occurs when processing the operation).
- Click on the Refund via Getnet Credit Card button (a message will appear informing you that the operation cannot be undone).
That’s it, the refund has now been successfully completed and will appear with the reversed amount highlighted in red.
To check the status of the refunded order, go to the WordPress admin panel: “WooCommerce“> “Orders“. Locate the order and the REFUNDED status will already appear and you will also receive the Log message that “the chargeback was successful”.
To check the Log message, go to the WordPress admin panel: “WooCommerce“>”Status“>”Logs tab“>“Select the transaction”>Click on view“. The message with the status of the transaction successfully canceled and its value will appear.
7.3. Billet
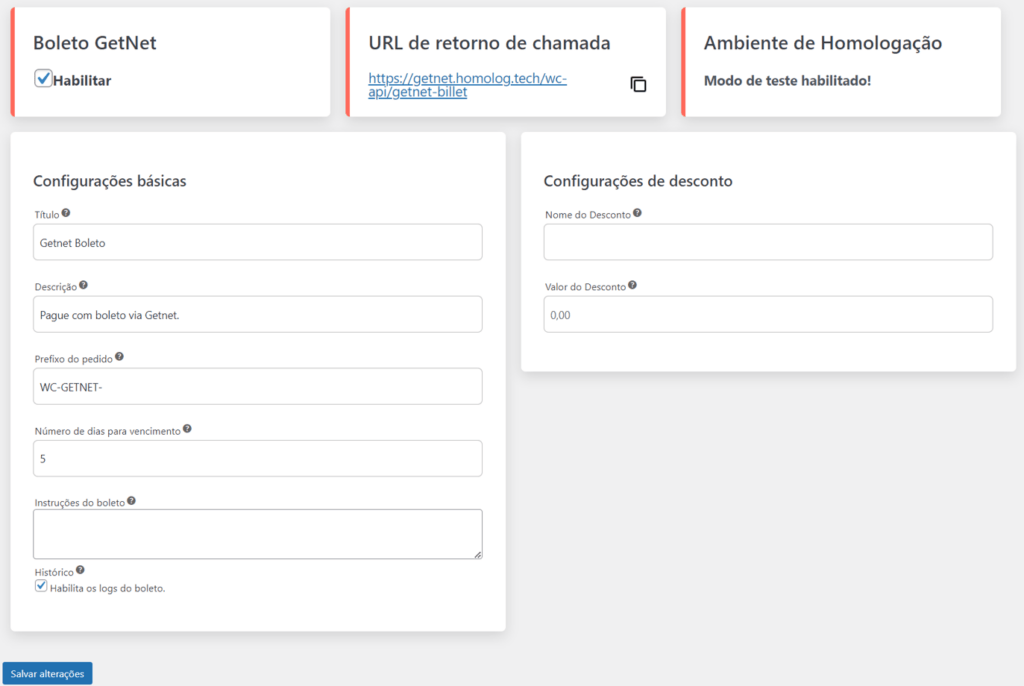
- Check option: Enable Billet Getnet;
- Insert title – Controls the title the user sees during checkout;
- Insert description – Controls the description the user sees during checkout;
- Enter order prefix – Enter a prefix for your order numbers. If you use your Getnet account for several stores, make sure that this prefix is unique;
- Number of days to expiration – Days on which the boleto is due once it has been printed;
- Billet instructions – Instructions to appear on the boleto;
- History– Check the option: Enable the boleto logs (getnet-billet-order or getnet-billet-order-error. To view: “WooCommerce” > “Status” > “Logs”).
- Discount settings:
- Discount Name – Enter the name of the discount (Default name: Getnet Discount);
- Discount amount – Enter the discount amount (Example: 10.00%), discount in percent;
- Save changes – Click on the Save changes button.
7.4. Pix
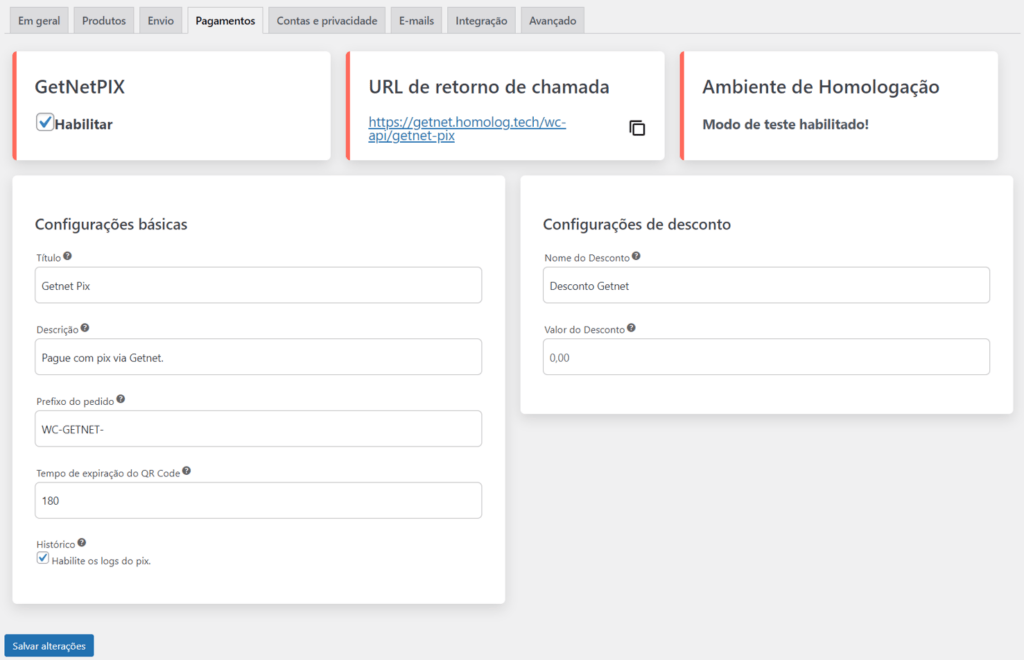
- Check option: Enable Getnet Pix;
- Insert title – Controls the title the user sees during checkout;
- Insert description – Controls the description the user sees during checkout;
- Enter order prefix – Enter a prefix for your order numbers. If you use your Getnet account for several stores, make sure that this prefix is unique;
- History– Check the option: Enable the pix logs (getnet-pix-order or getnet-pix-order-error. To view: “WooCommerce” > “Status” > “Logs”);
- Discount Name – Enter the name of the discount (Default name: Getnet Discount);
- Discount amount – Enter the discount amount (Example: 10.00%), discount in percent;
- Save changes – Click on the Save changes button.
ATTENTION! The Callback URL for the pix payment method is only available in the production environment.
8. Tests
Once properly configured, carry out the tests according to the environment, remember that purchases in a test environment (homologation) are not carried out, be careful not to keep the store activated in a test environment.
9. Debug
To debug and view logs with reasons for errors, integration problems or configuration in Getnet payment methods in your store, follow the instructions below.
9.1. Activating Debug Mode
First, you must activate debug mode (enable the logs) in the method for which the problem is occurring and you want to debug, it is an option that appears at the end of the configuration of each Getnet payment method in your store.
9.2. Purchase Simulation
Once activated, simulate a purchase so that a payment request is made and the system saves the logs.
9.3. Viewing Logs
Once the purchase has been simulated and the error has been returned, go to the WordPress admin panel: “Woocommerce”>“Status”>“Logs”, select the Getnet log corresponding to the payment method and date on which you carried out the test, and view the logs to check the error messages returned.
10. Configuring Callback URLs
To update the payment, you need to configure the Callback URLs in the Getnet administration panel and then send an e-mail to: [email protected], requesting the release of the URLs configured in the Getnet firewall.
Suggested sample request e-mail:
“I would like to request firewall clearance for the following Callback URLs for our e-commerce:
‘https://YOURDOMAIN.com.br’
‘https://YOURDOMAIN.com.br/wc-api/getnet-creditcard’
‘https://YOURDOMAIN.com.br/wc-api/getnet-pix’
‘https://YOURDOMAIN.com.br/wc-api/getnet-billet’
These URLs are already registered on our website and on the Getnet portal, but we are not receiving Callbacks correctly.
Our Seller ID is:
Our CNPJ:
Our EC:”
Note: Callbacks will only work if the Callback URLs have been registered and configured with support.
- In the plugin, select the desired payment method;
- Copy the Callback URL as shown below:
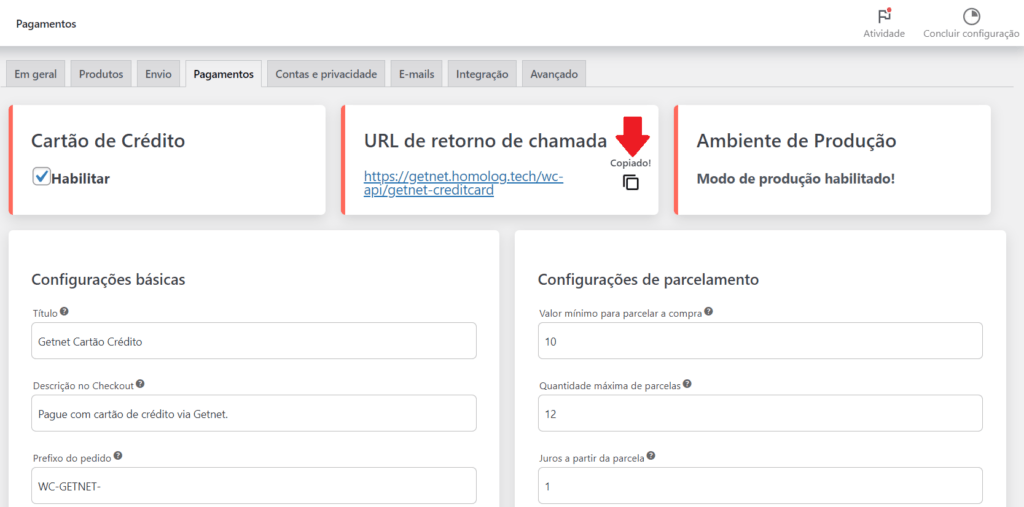
Note: in this example the callback URL for Credit Card is https://getnet.homolog.tech/wc-api/getnet-creditcard
Once the Callback URL has been copied, access the Getnet administration panel in the “Settings” option and select the corresponding Callback option and paste it into the desired payment method:
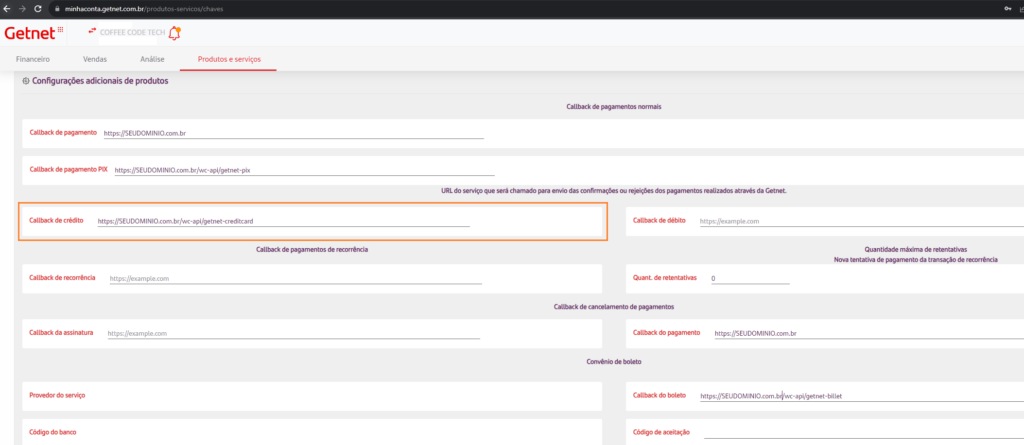
Please note that each payment method has a different URL, so you should do the same for all the payment methods you use. This way, every update to the payment will be updated in your woocommerce order.
11. Updating the plugin
Coffee Code releases regular updates of the Coffee Code – Getnet for WooCommerce plugin. To ensure that you are using the latest version of the plugin, follow these steps:
- Access the administrative panel of your WordPress site.
- Click on “Plugins” > “Plugins instalados“.
- Locate the plugin Coffee Code – Getnet for WooCommerce.
- Click on the “Update” button to update the plugin.
12. Support
The Coffee Code – Getnet for WooCommerce plugin is an easy way to add the Getnet payment method to your WordPress site. By following the instructions in this manual, you will be able to install and configure the plugin quickly and easily.
For help with the Coffee Code – Getnet for WooCommerce plugin, visit the Coffee Code website or go to the plugin’s documentation.
13. Employees and Developers
“Coffee Code – Getnet for WooCommerce” is open source software..
The following people contributed to this plugin:
Alexandre Anjos
Aline Gonçalves
Ivanilton Gomes
Jônatan Gouveia
Rafael Dias Bartolucci
Ritchelly Sá Domingos
Wesley Santos
Enter
Contact
Tell us about your challenges and we'll show you how to achieve them. For this team, there's nothing a good cup of coffee can't solve.
[email protected]Talk to us
"*" indicates required fields